KNF:Service provider koppeling testen/en: verschil tussen versies
Geen bewerkingssamenvatting |
|||
| (12 tussenliggende versies door dezelfde gebruiker niet weergegeven) | |||
| Regel 1: | Regel 1: | ||
{{ | {{PageTitleCustom|title=Testing as Service Provider|name=Entree Federation|image=true|imageurl=KNF:Hoofdpagina/en}} | ||
<br/> | <br/> | ||
__TOC__ | __TOC__ | ||
During the implementation of a connection with Entree Federation the Reference Identity Provider can be used for testing purposes. | During the implementation of a connection with Entree Federation the Reference Identity Provider can be used for testing purposes. | ||
With the help of this application the authentication | With the help of this application the authentication process of a user can be simulated. | ||
==Step 1: Start authentication== | ==Step 1: Start authentication== | ||
Open your browser and navigate to the page of your application where you can start the authentication | Open your browser and navigate to the page of your application where you can start the authentication process via Entree Federation. | ||
==Step 2: Select the Identity Provider== | ==Step 2: Select the Identity Provider== | ||
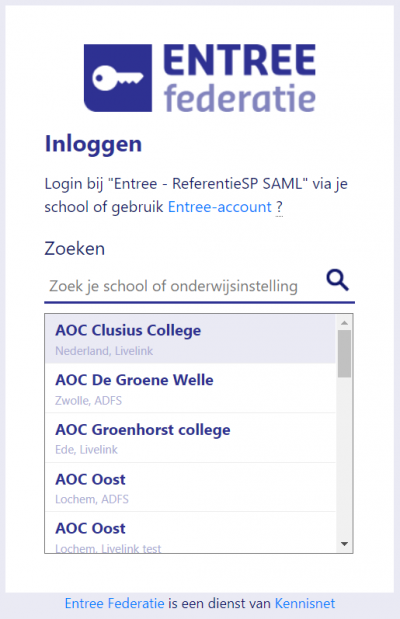
You will be redirected to the WAYF-screen ('''W'''here '''A'''re '''Y'''ou '''F'''rom) of the Entree Federation. | You will be redirected to the WAYF-screen ('''W'''here '''A'''re '''Y'''ou '''F'''rom) of the Entree Federation. | ||
[[File:Wayf01.PNG|400px|left]]<br clear="all"> | [[File:Wayf01.PNG|400px|left]]<br clear="all"> | ||
<br/> | <br/> | ||
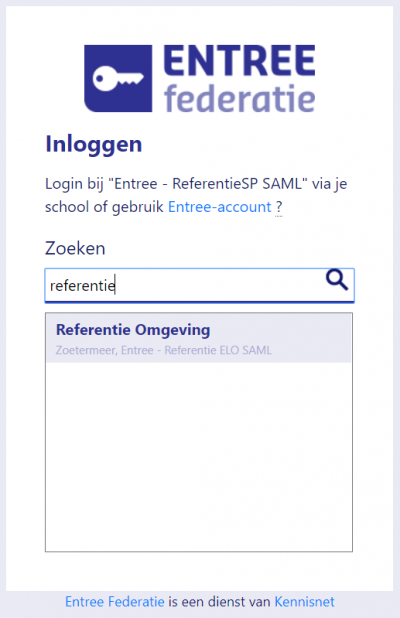
Typ in the searchbox 'referentie' ('reference'). | Typ in the searchbox 'referentie' ('reference'). | ||
[[File:Wayf_referentie_01.PNG| | [[File:Wayf_referentie_01.PNG|400px|left]]<br clear="all"> | ||
<br/> | <br/> | ||
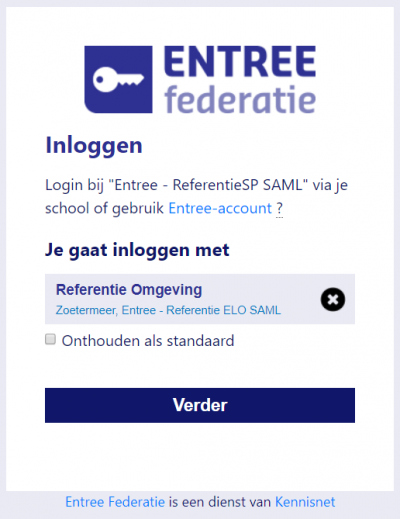
After which you select ' | After which you select 'Referentie Omgeving' and click on 'Verder' ('Continue'). | ||
[[File:Wayf_referentie_02.PNG| | [[File:Wayf_referentie_02.PNG|400px|left]]<br clear="all"> | ||
==Step 3: Reference Identity Provider== | ==Step 3: Reference Identity Provider== | ||
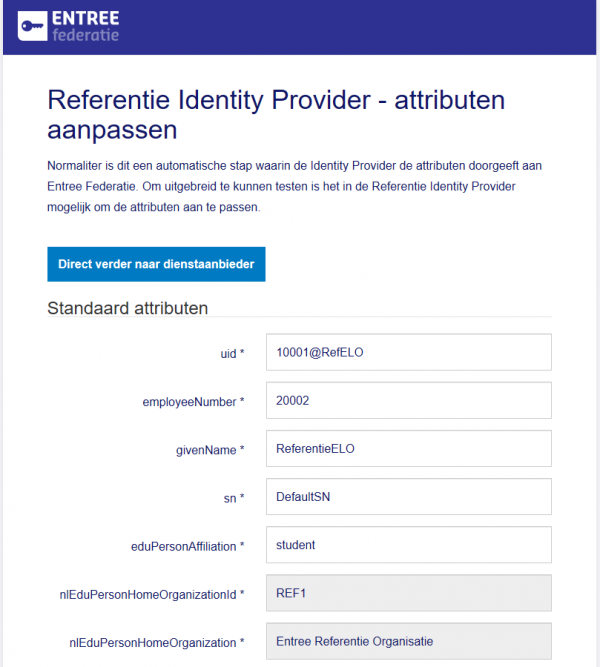
You will now be redirected to the '''Reference Identity Provider''' of the Entree Federation. | You will now be redirected to the '''Reference Identity Provider''' of the Entree Federation. | ||
You're | You're shown a list of attributes that will be send to your application. | ||
These attributes are divided in a set of '''Standard attributes''' ('''Standaard attributen''') and a set of '''Additional attributes''' ('''Aanvullende attributen''') ([[KNF:Attributen_overzicht_voor_Service_Providers/en|here you can find an overview of the attributes]]). | |||
* | * Standard attributes will always be passed on to a Service Provider by Entree Federation during an authentication. | ||
* | * Additional attributes will only be passed on to a Service Provider after the school has given explicit permission by the means of a signed [https://support.kennisnet.org/Knowledgebase/Article/View/511 Attribute Release Policy]. | ||
[[File:Referentie_Identity_Provider_01.PNG|600px|left]]<br clear="all"> | [[File:Referentie_Identity_Provider_01.PNG|600px|left]]<br clear="all"> | ||
<br/> | <br/> | ||
| Regel 36: | Regel 32: | ||
==Step 4: Sending the attributes== | ==Step 4: Sending the attributes== | ||
If you're ready with modifying the attributes you can click on 'Direct verder naar dienstaanbieder' ('Continue directly to Service Provider') | If you're ready with modifying the attributes you can click on 'Direct verder naar dienstaanbieder' ('Continue directly to Service Provider') at the top of the page or 'Verder naar dienstaanbieder' ('Continue to Service Provider') at the bottom of the page. | ||
The authentication message containing the attributes will now be send to your application. Based on these attributes you can identify and authorise the user. | The authentication message containing the attributes will now be send to your application. Based on these attributes you can identify and authorise the user. | ||
Huidige versie van 16 aug 2018 16:33
 Entree Federation: Testing as Service Provider
During the implementation of a connection with Entree Federation the Reference Identity Provider can be used for testing purposes. With the help of this application the authentication process of a user can be simulated.
Step 1: Start authentication
Open your browser and navigate to the page of your application where you can start the authentication process via Entree Federation.
Step 2: Select the Identity Provider
You will be redirected to the WAYF-screen (Where Are You From) of the Entree Federation.
Typ in the searchbox 'referentie' ('reference').
After which you select 'Referentie Omgeving' and click on 'Verder' ('Continue').
Step 3: Reference Identity Provider
You will now be redirected to the Reference Identity Provider of the Entree Federation. You're shown a list of attributes that will be send to your application. These attributes are divided in a set of Standard attributes (Standaard attributen) and a set of Additional attributes (Aanvullende attributen) (here you can find an overview of the attributes).
- Standard attributes will always be passed on to a Service Provider by Entree Federation during an authentication.
- Additional attributes will only be passed on to a Service Provider after the school has given explicit permission by the means of a signed Attribute Release Policy.
If necessary you can change the values of the attributes, accept for nlEduPersonHomeOrganizationId and nlEduPersonHomeOrganization.
Note: In order for your application to be able to receive additional attributes from the Reference Identity Provider, Kennisnet has to change the configuration. You can contact Kennisnet for this.
Step 4: Sending the attributes
If you're ready with modifying the attributes you can click on 'Direct verder naar dienstaanbieder' ('Continue directly to Service Provider') at the top of the page or 'Verder naar dienstaanbieder' ('Continue to Service Provider') at the bottom of the page. The authentication message containing the attributes will now be send to your application. Based on these attributes you can identify and authorise the user.


